#22: PSA — How to make a climbing harness out of webbing and rope
Or, what to do when you forget your harness at home
Today I offer a PSA.
But first, brief background: today was Thomas’ day to go check out a project. I picked him up from a community event, we stopped by his house to grab his gear, and drove to the third parking lot at Rumney crags. The climb he wanted to check out is a classic called Stoned Temple Pilot, 12a, which is at the Prudential — one of the furthest crags from the road, up a steep hill for about twenty minutes, passing Northwest Territories, passing Very Nice Crag, until finally about thirty minutes in you get to a hulking cave high up on the side of Rattlesnake. The point is, it’s pretty far up and out there.
We plopped down the rope under the climb, then Thomas opened his bag, and boom: no harness. This isn’t the first time we’ve gotten to a crag and he’s forgotten something (last time it was all the quick draws), so all we could do is laugh. It was already past 5pm. About two and a half hours of daylight left. His harness wasn’t just back at the parking lot. It was in his car, which was in his garage, at his house.
“You know how to make a harness from webbing?” I asked?
Turns out: he did.
Step 1: Bowline on a bight
The applicable knot to tie is called a bowline on a bight.
Thomas was familiar with it already because it’s used to make what’s called a “bosun’s chair,” or a rope seat used to shimmy up a mast on a tall sailboat. Thomas had used it many times in the past in his sailing days.
If you’re familiar with a bowline (often used to tie in on lead, or in a variety of situations in sailing), then you’ll already have confidence in this knot. But if you’re not familiar, no need to worry: it’s rock solid secure, with the added benefit of being easy to untie even after it’s been weighted.
Here’s a good animation on how to tie it: https://www.animatedknots.com/bowline-on-a-bight-knot
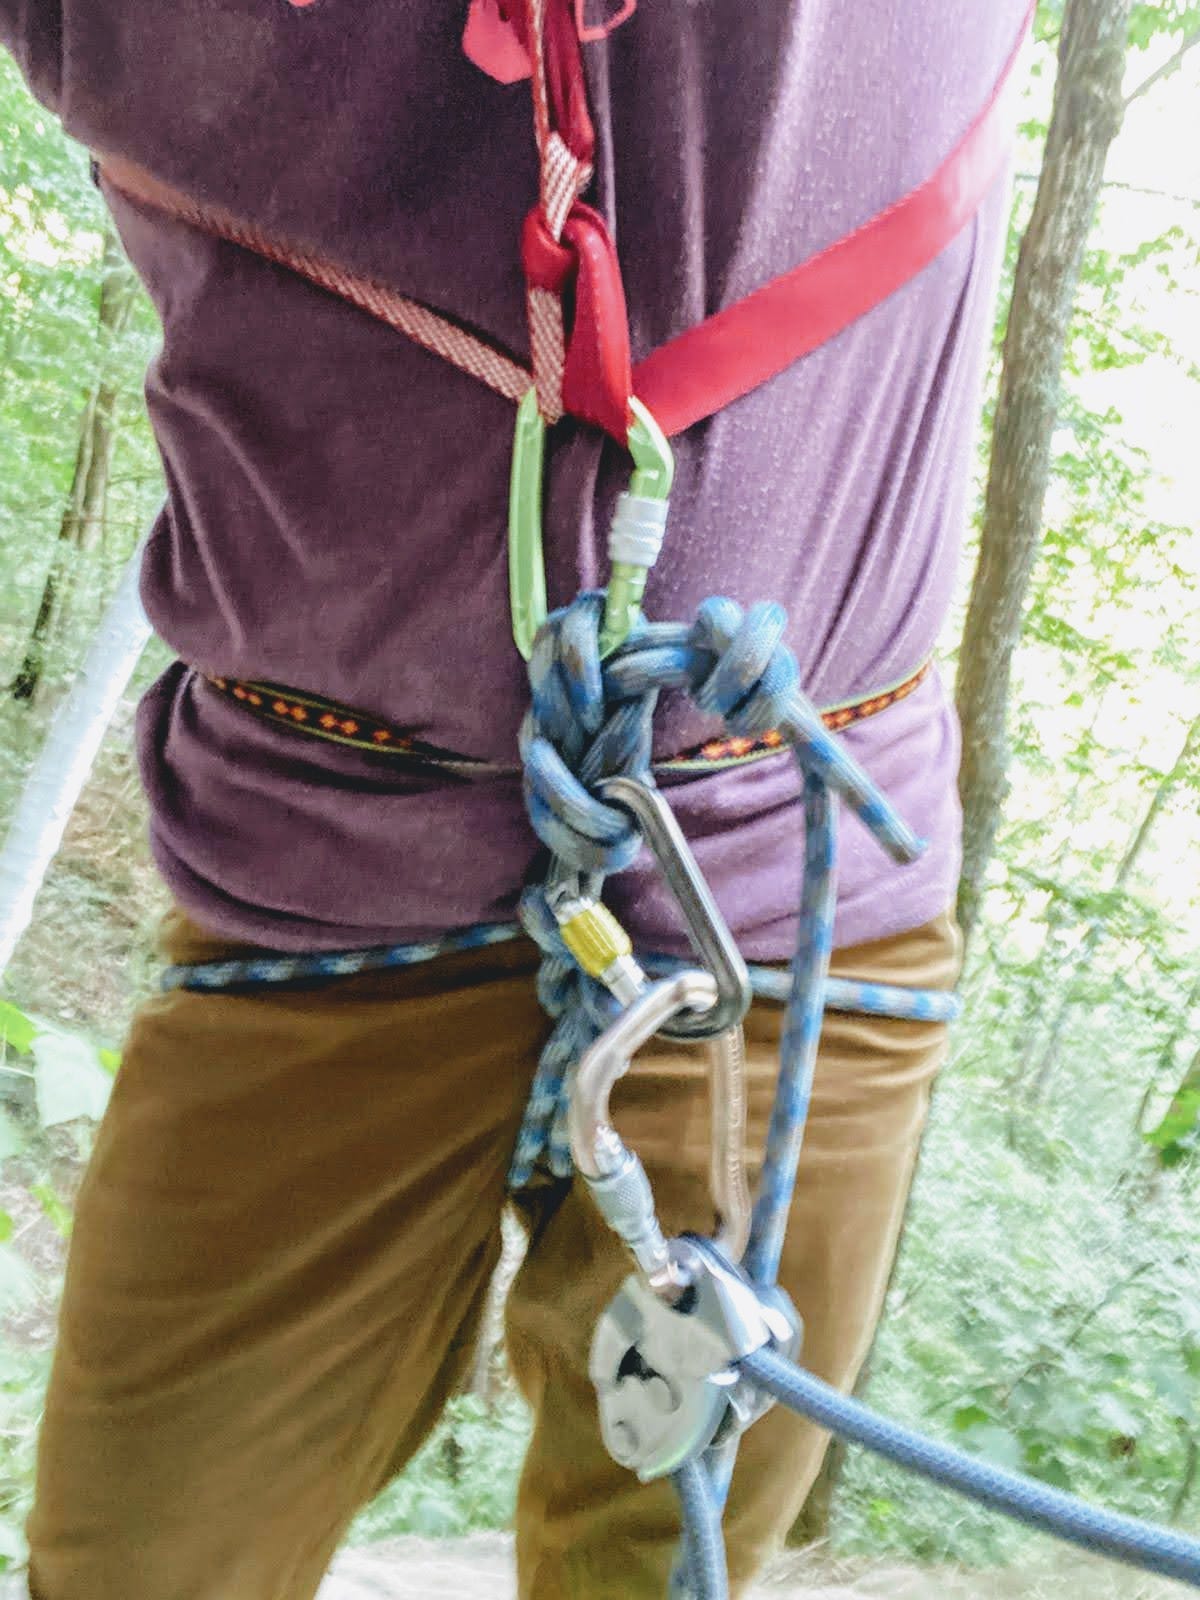
The nice thing about the knot is you end up with two loops afterward. These are the two loops for your legs to go through. Here’s Thomas basically ready to climb:

Step 2: Figure Eight
Step 2 is to take the loose end of the rope and the other side of the rope that come out from bottom of the bowline, and tie a figure eight. This isn’t a figure eight follow through, like one would use to tie into the harness — it’s simply a figure eight overhand.
This knot is used kind of like you would use your belay loop. It’s the anchor point the rest of the rope will come out of, running to your belayer. And it’s the place you can loop in a locking carabiner if you want to belay (but that’s farther down). Next up:
Step 3: Make a chest harness out of webbing
This part’s easy and can be done a few ways. We had some alpine draws we cannibalized, but you could also do it with one long runner tied in a loop. We took two shorter pieces and joined them using a single prussic knot.
Then each piece of webbing gets slung over your shoulder. The end result is basically an “x” across your chest.
Why the chest harness? Otherwise this would just be two leg loops — not good as soon as you’re climbing horizontal, or if you take any fall whatsoever. The chest harness keeps you upright.
Step 4: Connect with a locking carabiner
Lastly, use a locker around both sides of the chest harness, and feed it through the figure eight knot as pictured above. Feeding it through the knot has the added advantage of making sure the figure eight does cinch up so tight while you climb that you’ll never get it out.
Basically, at this point you’re ready to climb. Your partner simply grabs the loose end of the rope and puts you on belay.
Step 5: Add another locker to belay
To belay, we added another locker threaded through the other side of the figure eight knot. Here’s Thomas again:

We used two lockers here to get the belay device into a more comfortable stance (not ideal, but we were out of webbing).
After that, we stick clipped the first bolt, and took a hang close to the ground just to make sure everything felt good. Obviously, both the belayer and climber should be inspecting each other’s setup, and before we set off on the 12a Thomas had his eye on, we both checked and double-checked that we were comfortable with this.
Every piece of the system is solid, and since the rope is dynamic it does give a little stretch. Thomas even took a small lead fall on it. Although, but the second one he said the rope was digging into his thigh quite a bit.
Still — better than calling it a day and going home.


